Direction & Contents
Includes
- SBox
- USB charger cable (white)
- USB data cable (black)
- Wrist strap with stand
- Printed manual
Directions
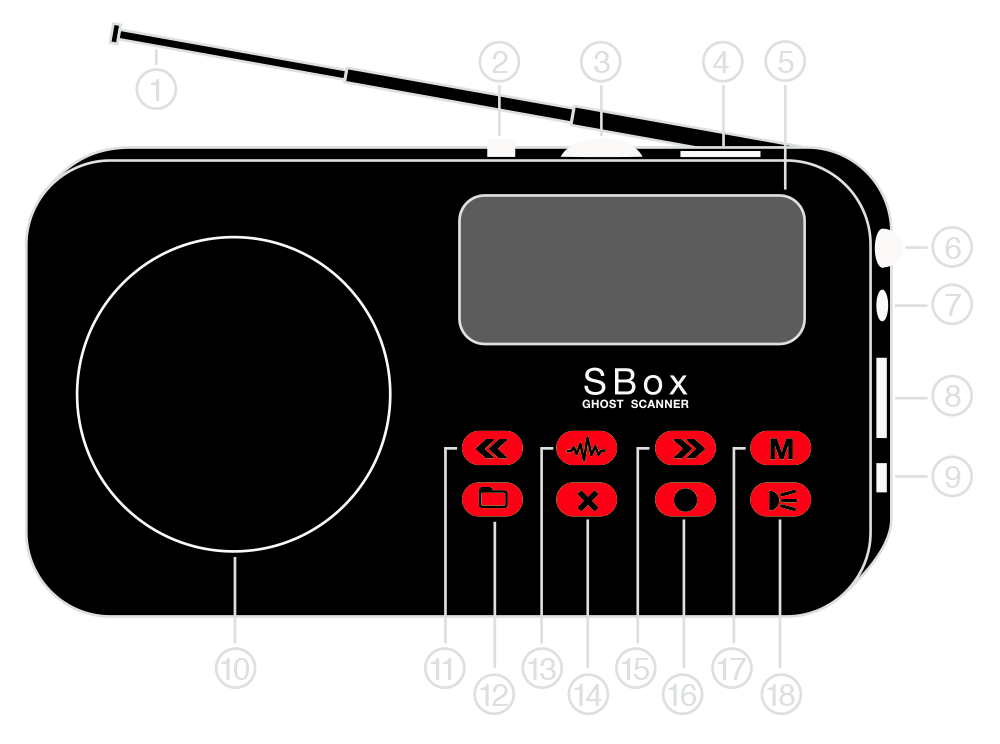
1 Antenna
2 On/Off
3 Volume
4 Micro SD Card Slot
5 Display
6 Flashlight
7 Headphone Port
8 USB Port
9 Charging/Aux Input Port
10 Speaker
11 Scan Reverse
12 Loop File / Play All
13 Scan
14 Delete File
15 Scan Forward
16 Record
17 Modes
18 Flashlight
Quick Start Guide
- Charge before use. (see charging instructions)
- Turn device on using ON/OFF slider button (2).
- Press SCAN (13) to begin FM Scan Forward.
- Press RECORD (16) to record (requires SD card) and hit RECORD (16) again to stop recording.
- Turn device off using ON/OFF slider button (2).
Power & Charging
SBox is powered by a rechargeable battery. To charge the device use the provided USB charging cable (WHITE) to connect to a USB power source. This could be a computer with a USB power, USB power strip or USB battery pack for quick mobile power. When charging the flashlight LED will show red and will turn off once complete. To plug the device into a AC power outlet, you will need to use a USB to AC power adapter (not provided). When SBox is powered on you will see a battery icon to the left of the display indicating battery life.
Modes
To change modes press the MODE button (17). When switching modes, you will hear a verbal queue to indicate each mode as follows. It may take a moment to switch modes.
- SCANNING FM
This mode is used for conducting spirit box sweep sessions using the FM band. - SCANNING AM
Scanning Mode is used for conducting spirit box sweep sessions using the AM band. - LINE IN
This mode allows you to plug in an audio device to use the SBox as an external wired speaker. Use the provided 3.5 audio-to-microUSB cable to connect another compatible audio device. - BLUETOOTH
Bluetooth allows you to connect a bluetooth audio device to use the SBox as an external wireless speaker. - PLAYBACK
This mode allows you to play recorded spirit box sessions and other audio files on the memory card or from a USB drive.
Scanning
Press SCAN (13) to start and stop the sweep.
To change sweep direction press REVERSE (11) to sweep in the reverse direction or FORWARD (15) to sweep forward. If a sweep is already active you must press SCAN (13) again to stop the current sweep and resume in the desired direction.
Press RECORD (16) to record sweep audio.
Record
To record sweep or EVP audio, you must first insert a micro SD card into the port at the top of the device (4). Make sure to face it in the proper direction to insert properly. It will click into place.
In order to record radio sweep audio, first start the sweep in the direction you prefer. Once the sweep has begun press RECORD (16). A ‘SD’ icon will appear on the screen to indicate it is recording to the SD card.
To stop recording press RECORD (16) again. Stop recording after each session to save the file properly. As soon as you stop the recording, it will play the latest recording for review.
While recording you can start, pause or change direction on the sweep as you wish.
To record EVPs or voice only, press MODE (17) to advance to ‘Playback’ mode, then press record. This will begin recording from a built-in microphone. You cannot use the radio sweep in this mode.
To access recorded files you can do either:
- Remove SD card from the memory slot (4) and insert it into a computer using any micro SD card reader.
- Plug SBox directly into a computer via the USB data port (8) using the provided USB cable (normal size USB on both ends).
Playback
To play audio files from the SD card press MODE (17) to ‘Playback’.
Press FORWARD (15) or BACK (11) to select a file. Sbox will play the audio file. Each file is indicated by a number in sequence.
Click SCAN (13) again to pause playback.
Press FILE (12) to loop play the current audio file. Press FILE again to play continue through playing all files.
File Transfer
To transfer or view the files on the SBox SD card, plug the USB data cable (BLACK) into a computer. The SBox display will show ‘PC’ and a drive should show active on your computer momentarily.
See SBox Specs for details on any technical specifications.